Samba4 GA Release - Virtualbox LAB
Introduction
Configuring Samba has always been a pain in the you-know-what. There is always some kind of permission here or there missing or misconfiguration resulting in endless hours of log trawling and frustrated users.My profile photo on this blog was taken during just such a time...
So I decided to build a LAB for Samba 4. My LAB is for a fresh install. I have not yet tried an upgrade. Maybe that will come in a later post.
The Samba4 how-to on their WIKI is very good and formed the basis of most of the work. (http://wiki.samba.org/index.php/Samba4/HOWTO)
Lab Environment
- LAB Built on Virtual Box using Ubuntu 12.04 LTS
- Samba Server
- CentOS 6.3 x86_64 - Text based minimal install
- 512mb RAM
- 4GB OS (default partition layout from installer)
- 8GB Secondary disk
- 1xNIC on Host Only Adapter (Use dnsmasq on your host machine as per: http://david-latham.blogspot.co.nz/2012/05/create-nat-for-virtualbox-host-only.html
- 1xNIC on Internal Only Adapter (You will be serving the domain on a subnet assigned to this nic)
- Client
- Windows2003 R2 Standard Edition
Samba OS Build
Hard Disk Configuration
The Samba HOW-TO wiki states that some specific mount attributes are applied to your disks. Here is my fstab.[root@samba ~]# cat /etc/fstab
#
# /etc/fstab
# Created by anaconda on Thu Dec 13 13:55:41 2012
#
# Accessible filesystems, by reference, are maintained under '/dev/disk'
# See man pages fstab(5), findfs(8), mount(8) and/or blkid(8) for more info
#
/dev/mapper/VolGroup-lv_root / ext4 user_xattr,acl,barrier=1 1 1
# SAMBA
/dev/mapper/vgsamba-lvwinhome /samba/home ext4 user_xattr,acl,barrier=1 1 1
Network Interface Configuration
- /etc/sysconfig/network
NETWORKING=yes
HOSTNAME=samba.example.com
- /etc/sysconfig/network-scripts/ifcfg-eth0
DEVICE="eth0"
NM_CONTROLLED="no"
ONBOOT="yes"
BOOTPROTO="dhcp"
DHCP_HOSTNAME=samba.vbox.local
- /etc/sysconfig/network-scripts/ifcfg-eth1
DEVICE="eth1"
NM_CONTROLLED="no"
ONBOOT="yes"
BOOTPROTO="none"
IPADDR="10.1.1.1"
NETMASK="255.255.255.0"
Iptables
For Iptables, I went with an open configuration. You should have a good and proper IPTABLES configuration in your production environment. This LAB is about SAMBA4 not IPTABLES.- /etc/sysconfig/iptables
- The IPTABLES script below impliments a SNAT on all traffic to the IP Address of eth0. Your IP address might be different. This all depends on how you configured your host only network in Virtualbox.
# Generated by iptables-save v1.4.7 on Thu Dec 13 14:26:37 2012
*nat
:PREROUTING ACCEPT [0:0]
:POSTROUTING ACCEPT [0:0]
:OUTPUT ACCEPT [0:0]
-A POSTROUTING -o eth0 -j SNAT --to-source 192.168.56.76
COMMIT
# Completed on Thu Dec 13 14:26:37 2012
# Generated by iptables-save v1.4.7 on Thu Dec 13 14:26:37 2012
*filter
:INPUT ACCEPT [12:1634]
:FORWARD ACCEPT [0:0]
:OUTPUT ACCEPT [0:0]
COMMIT
# Completed on Thu Dec 13 14:26:37 2012
Enable IPv4 Packet Forwarding
Once you do this, routing will take care of itself.- Set net.ipv4.ip_forward = 1 in /etc/sysctl.conf
- execute
- sysctl -p to read the new value.
Software pre-requisites and services
Software packages
First establish the following dependancies. (Note I used the groupinstall "Development tools" for convenience.Read: http://wiki.samba.org/index.php/Samba_4/OS_Requirements
- yum -y install libacl-devel libblkid-devel gnutls-devel readline-devel python-devel gdb pkgconfig krb5-workstation zlib-devel setroubleshoot-server setroubleshoot-plugins policycoreutils-python libsemanage-python setools-libs-python setools-libs popt-devel libpcap-devel sqlite-devel libidn-devel libxml2-devel libacl-devel libsepol-devel libattr-devel keyutils-libs-devel cyrus-sasl-devel openssh-clients bind-utils dhcpd tcpdump man manpages wget
- yum -y groupinstall 'Development tools'
NTP
- Download and install the latest NTP.
- DO NOT USE THE Distro Version as it does not support "signed NTP"
- Use the "more complex ntp.conf" (2c)
- Instructions here: http://wiki.samba.org/index.php/Samba4/HOWTO#Step_10:_Configure_NTP_.28Optional.29
- Note: I used ./configure --prefix=/ to ensure that NTP would be installed in my path. This version did not ship with any useful init script so I just added the following to my rc.local:
# Start NTP Daemon
/sbin/ntpd -c /etc/ntp.conf
DHCP Server
- Configure dhcpd to provide ip addresses on the internal network.
- dhcpd should also provide the netbios and wins ip addresses.
subnet 10.1.1.0 netmask 255.255.255.0 {
option routers 10.1.1.1;
option subnet-mask 255.255.255.0;
option domain-name "internal.local";
option domain-name-servers 10.1.1.1;
option netbios-name-servers 10.1.1.1;
range 10.1.1.10 10.1.1.100;
}
- Edit /etc/sysconfig/dhcpd and set DHCPDARGS=eth1
- service start dhcpd
- chkconfig dhcpd on
DNS Server
I did not configure bind or dnsmasq for the Domain. Samba4 Ships with an internal DNS server which is adequate for the purposes of demonstrating Samba4 awesomness. The excellent BIND Nameserver is supported by Samba4 along with dns replication and all that jazz. I have not tried it. If you have, let us know in the comments below how it went.Once Samba is installed and operational there is a step required to make Samba forward DNS queries to your host's network as well as make the OS resolv.conf use the correct DNS. This is because dhclient likes to automagially configure your resolv.conf every time you boot. My work-around is just to overwrite it in /etc/rc.local.
# fix resolv.conf
mv /etc/resolv.conf /etc/resolv.conf.old
cat >> /etc/resolv.conf << EOF
# Updated by rc.local script
domain samba4.internal
nameserver 10.1.1.1
EOF
Install Samba4
Installing Samba4 is fairly straightforward once you have all the pre-requisites in place. It's well documented on the samba4 wiki so I won't get into it in any great detail here.I highly recommend completing the file system and kerberos tests outlined in the wiki how-to. (http://wiki.samba.org/index.php/Samba4/HOWTO#Step_6:_Testing_Samba4)
smb.conf
This is my lab smb.conf.- workgroups, realm, netbios and server role all define the function of this samba instance.
- dns forwarder tells samba where to send dns requests for hosts it knows nothing about.
- The netlogon share is for the logon script. I have a log on script located in it's path and I set the default logon script in windows for each user to point to this script.
- sysvol is (unused at this stage)
- home is where all the user's WINDOWS home directories live
- There are no unix home directories that map to the windows home directories
- share is where all standard shares will live.
[root@samba ~]# cd /usr/local/samba/etc
[root@samba etc]# cat smb.conf
# Global parameters
[global]
workgroup = SAMBA4
realm = SAMBA4.INTERNAL
netbios name = SAMBA
server role = active directory domain controller
dns forwarder = 192.168.56.1
[netlogon]
path = /usr/local/samba/var/locks/sysvol/samba4.internal/scripts
read only = No
[sysvol]
path = /usr/local/samba/var/locks/sysvol
read only = No
[home]
comment = Home Directories
path = /samba/home
read only = No
[share]
comment = Office Shares
path = /samba/home/shares
read only = No
[root@samba etc]#
Configuring File Permissions and Shares
Once these shares were configured in this basic way using smb.conf I was able to browse to the folders in my windows client using as follows:\\samba\home
\\samba\share
\\samba\netlogon\logon.bat
\\samba\sysvol
This was easily the most difficult part of the process for me to work out. Once worked out though, it's a piece of cake. Critically your file system must be mounted with the acl mount option.
I have figured out that the most straight forward way of managing file shares is via Windows. ie: Let samba take care of the acl entries in Linux.
User accounts and home directories
Home directory ACLs
Before creating user accounts its critical to make sure that the windows ACLs are configured correctly for \\samba\home. Mine are as follows:First remove inheritance. IE: The permissions for \\samba\home must not inherit from \\samba. When removing inheritance hit the remove button and remove any other permissions groups / users listed.
Then add new ones as follows:
- Administrators = Full Control
- Everyone = No Control (all boxes unticked)
- Domain Users = Special Permissions as follows
- Traverse Folder and Execute File = TICKED
- All other special permissions = UNTICKED
Creating new users
Run the dsa.msc snap in. Installation instructions for the dsa.msc are covered in the samba4 wiki howto.Create a new user using the "New -> User" task in the DSA Snapin. The following screenshots show what to do:
 |
| Add user Test User with username test.user |
 |
| Set a password |
 |
| Confirm details |
 | |||
| Bring up the Profile tab under properties for this new user. |
 |
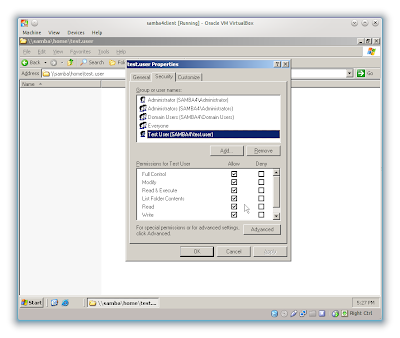
| Confirm folder security permissions are correct. |
Use a similar approach to managing shared folders for group access.
So far I have not encountered any gotchas with this approach.

Comments