Extending the AD Schema on Samba4 - Part 1
My last post on Samba4 showed how easy it is to install and configure an AD Service on Linux. If you've not read it then please have a look. (http://david-latham.blogspot.co.nz/2012/12/samba4-ga-release-virtualbox-lab.html)
This post show's how to extend the Samba4 Active Directory Schema. Specifically for YubiKey integration.
YubiKey's can be purchased for a relativlely low price from Yubico. Please visit their website (www.yubico.com) for more information.
LDAP Integration is very well covered by Michal Ludvig on his website and github. (http://www.logix.cz/michal/devel/yubikey-ldap/) In fact we are planning to leverage his implementation at our work and are considering donating towards what's obviously a very good cause.
Now seeing as though LDAP and AD are so similar and exhibit many of the same APIs, I began to wonder how this might fit in with Samba4. Eventually we might end up using Samba4 for our domain and so I needed to figure out if I could, somehow, "port" the LDAP Schemas for Yubikey to AD. I think I have managed it with extensive help from another blog. Thanks to Kurt Hudson and his wonderful article on www.informit.com titled, "Making AD Work Harder | Extending the Active Directory Schema to Track Custom Info"
I should also acknowledge, once again, the Samba Wiki for a crucial piece of the puzzle in which we allow extensions to the Schema. (https://wiki.samba.org/index.php/Samba4/Schema_extenstions)
In a windows command prompt type:
Then use MMC -> Add Remove Snap-ins -> Active Directory Schema snap-in. (follow the instructions on Kurt Hudson's page.
The details for the Yubikey schema are available on Michal Ludvig's github site: https://raw.github.com/mludvig/yubikey-ldap/master/ldap-schema/yubikey-SunDS.ldif
The SunDS describes most closely the AD Version used in this article:
Here it is:
 Note, I ticked "multi valued" but in the part where I create a dialogue box to enter the key id's I do not allow for multiple values. That's on my TO DO List.

So that's the GUI method.
This post show's how to extend the Samba4 Active Directory Schema. Specifically for YubiKey integration.
YubiKey's can be purchased for a relativlely low price from Yubico. Please visit their website (www.yubico.com) for more information.
LDAP Integration is very well covered by Michal Ludvig on his website and github. (http://www.logix.cz/michal/devel/yubikey-ldap/) In fact we are planning to leverage his implementation at our work and are considering donating towards what's obviously a very good cause.
Now seeing as though LDAP and AD are so similar and exhibit many of the same APIs, I began to wonder how this might fit in with Samba4. Eventually we might end up using Samba4 for our domain and so I needed to figure out if I could, somehow, "port" the LDAP Schemas for Yubikey to AD. I think I have managed it with extensive help from another blog. Thanks to Kurt Hudson and his wonderful article on www.informit.com titled, "Making AD Work Harder | Extending the Active Directory Schema to Track Custom Info"
I should also acknowledge, once again, the Samba Wiki for a crucial piece of the puzzle in which we allow extensions to the Schema. (https://wiki.samba.org/index.php/Samba4/Schema_extenstions)
Step 1: Backup Your Master Server
In my case this was fairly simple. I just took a snapshot of my Virtualbox image. You need to do this though. Messing with an AD schema can be fairly dangerous, especially if it's a Samba4 AD. Samba's Wiki makes this quite clear.Step 2: Enable Schema Extensions
This is fairly straight forward and well explained on the Samba Wiki. First edit your smb.conf and add the following line into the [globals] section.dsdb:schema update allowed = trueThen restart the samba service.. (btw: If you are interested in an init script for Samba4 on Centos 6 then find it at the end of this article.)
Step 3: Set up Active Directory Schema Console (on Windows)
From here on, we will be working in Windows space. The Active Directory Schema console is not registered by default. So register it and create yourself a console.In a windows command prompt type:
regsvr32 schmmgmt.dll
Then use MMC -> Add Remove Snap-ins -> Active Directory Schema snap-in. (follow the instructions on Kurt Hudson's page.
Step 4: Add Yubikey Class and Attribute
You need an attribute before you can create an object class.The details for the Yubikey schema are available on Michal Ludvig's github site: https://raw.github.com/mludvig/yubikey-ldap/master/ldap-schema/yubikey-SunDS.ldif
The SunDS describes most closely the AD Version used in this article:
Here it is:
dn: cn=schema objectclass: top # # YubiKey LDAP schema for Sun Directory Server and OpenDJ # # Copy this file to/config/schema/05-yubikey.ldif # # Author: Michal Ludvig # Consider a small PayPal donation: # http://logix.cz/michal/devel/yubikey-ldap/ # # Converted for OpenDJ and Sun Directory Server by # Ludovic Poitou # attributeTypes: ( 1.3.6.1.4.1.40789.2012.11.1.2.1.1 NAME 'yubiKeyId' DESC 'Yubico YubiKey ID' EQUALITY caseIgnoreIA5Match SYNTAX 1.3.6.1.4.1.1466.115.121.1.26{128} ) objectClasses: ( 1.3.6.1.4.1.40789.2012.11.1.2.2.1 NAME 'yubiKeyUser' DESC 'Yubico YubiKey User' SUP top AUXILIARY MAY ( yubiKeyId ) )
Step 4a: Attribute
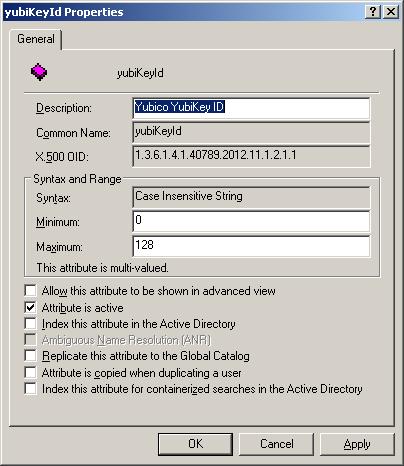
In the Active Directory Schema Snap-in Console do the following:- Right click the Attributes Node and select Create Attribute on the context menu. A message about the permanence of your operation will show up. Well, jump right in. You backed up in step 1.
- Fill in the details as follows:
- Common Name = yubiKeyId
- LDAP Display Name = yubiKeyId
- Unique X500 Object ID: = 1.3.6.1.4.1.40789.2012.11.1.2.1.1
- Description = Yubico YubiKey User
- Syntax = Case Insensitive String
- Minimum = 0
- Maximum = 128
- Multi Valued = Ticked
- Click OK to add the attribute to the Attributes list. If you expand the list, and scroll to the bottom, you will find yubiKeyId and you can right click, select properties and see something like this:
Step 4b: Add Yubikey Schema Object Class
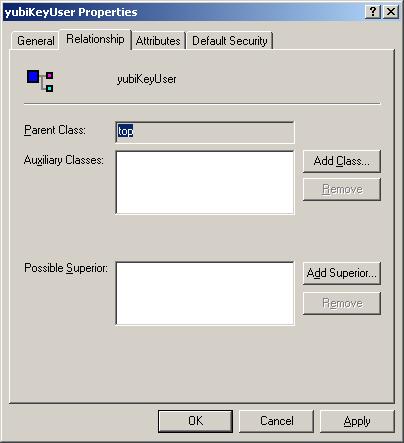
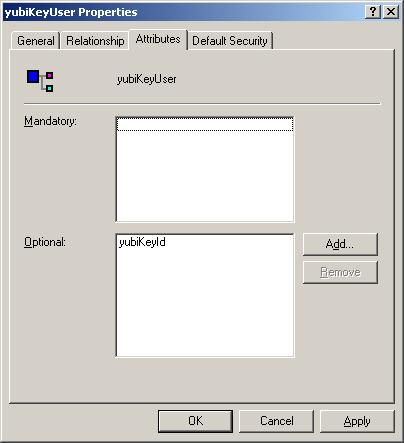
- Begin by right mouse clicking Classes and select Create Class in the context menu.
- Fill in the details as follows:
- Common Name: yubiKeyUser
- LDAP Display Name: yubiKeyUser
- Unique X500 Object ID: 1.3.6.1.4.1.40789.2012.11.1.2.2.1
- Description: Yubico YubiKey User
- Parent Class: top
- Class Type: Select Auxilary
- Click Next
- Click Add next to Opional:
- Scroll all the way to the bottom and select yubiKeyId
- Click OK
- Click Finish
- Expand the Classes node, scroll to the bottom and right click yubiKeyUser, select Properties to see the following:
My next post will show how to import ldif files to make this process easier.
Read part 2 here: http://david-latham.blogspot.co.nz/2012/12/extending-ad-schema-on-samba4-part-2.html
Comments