Posts

Showing posts from 2012

Extending the AD Schema on Samba4 - Part 2

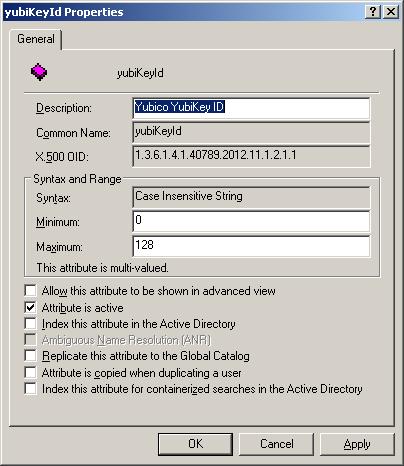
Importing LDIF files into Samba4 and Active Directory This is part 2 of the Extending AD Schema on Samba4 series.  The examples below are tested using the Samba4 LAB I created.  If you want more information on how that works then please read  http://david-latham.blogspot.co.nz/2012/12/samba4-ga-release-virtualbox-lab.html For part one, please read http://david-latham.blogspot.co.nz/2012/12/extending-ad-schema-on-samba4.html Unfortunately the format of an ldif file for creating new attributes and classes in the Schema Configuration are differ between Samba4 and Microsoft. The tools are slightly different too.  So this article will attempt to make it all clear. Find all the latest versions of code on this post at  https://github.com/linuxplayground/yubikey-ldap/tree/master/microsoft-schema Samba4 - ldbadd & ldbmodify As far as I can tell the only way to create a new class with a custom attribute in Samba4 (on the Linux command line) is first add the attribute with ldbad

Extending the AD Schema on Samba4 - Part 1

Image
My last post on Samba4 showed how easy it is to install and configure an AD Service on Linux.  If you've not read it then please have a look. ( http://david-latham.blogspot.co.nz/2012/12/samba4-ga-release-virtualbox-lab.html ) This post show's how to extend the Samba4 Active Directory Schema.  Specifically for YubiKey integration. YubiKey's can be purchased for a relativlely low price from Yubico.  Please visit their website (www.yubico.com) for more information. LDAP Integration is very well covered by Michal Ludvig on his website and github.  ( http://www.logix.cz/michal/devel/yubikey-ldap/ ) In fact we are planning to leverage his implementation at our work and are considering donating towards what's obviously a very good cause. Now seeing as though LDAP and AD are so similar and exhibit many of the same APIs, I began to wonder how this might fit in with Samba4.  Eventually we might end up using Samba4 for our domain and so I needed to figure out if I could,

Samba4 GA Release - Virtualbox LAB

Image
Introduction Configuring Samba has always been a pain in the you-know-what.  There is always some kind of permission here or there missing or misconfiguration resulting in endless hours of log trawling and frustrated users. My profile photo on this blog was taken during just such a time... So I decided to build a LAB for Samba 4.  My LAB is for a fresh install.  I have not yet tried an upgrade.  Maybe that will come in a later post. The Samba4 how-to on their WIKI is very good and formed the basis of most of the work.  ( http://wiki.samba.org/index.php/Samba4/HOWTO ) Lab Environment LAB Built on Virtual Box using Ubuntu 12.04 LTS Samba Server CentOS 6.3 x86_64 - Text based minimal install 512mb RAM 4GB OS (default partition layout from installer) 8GB Secondary disk 1xNIC on Host Only Adapter (Use dnsmasq on your host machine as per:  http://david-latham.blogspot.co.nz/2012/05/create-nat-for-virtualbox-host-only.html 1xNIC on Internal Only Adapter (You will be servin

Oracle Cloud Control

I had the occasion recently to deploy an OVM stack at a customer site.  Initially it was my intention to only deploy Enterprise Manager 12c and take advantage of the cloud control features within.  As it turned out, this provides merely a "remote control" function of an existing OVM Manager.  With this in mind, I could not find many advantages to using EM12c for Oracle virtual machine management. The next hurdle was with the hardware.  Of course, the physical servers we deployed the OVS 3.1.1. hyper-visor on were not "Oracle Certified."  Specifically DELL PowerEdge M620 Blade Servers.  ( http://www.dell.com/us/enterprise/p/poweredge-m620/pd?~ck=anav ) The customer had selected the Broadcom®  57810S-k Dual Port 10Gb KR blade NDC on board Network Adapter as well as the Mezzanine Broadcom 5719 Serdes Quad Port 1Gb providing a total of 6 ethernet ports, two of them 10GB. The storage array is Equalogic iSCSI SAN.  (Sorry the exact make / model of the SAN escapes me

Oracle Virtual Machine (OVM) LAB on VirtualBox

Oracle Virtual Machine (OVM) 3.1.1. was released on the 8th May 2012 and finally it's supported on VirtualBox.  This is great news for anyone who wants to give installing an OVM Lab a go. I gave it a go. I created 3 VirtualBox guests: Openfiler for iSCSI with a 40GB virtual disk for chopping up into LUNs and iSCSI. Oracle Linux 6.0 on which I installed OVM 3.1.1. in Demo mode.  This guest has 4GB of RAM assigned to it and a 25GB HD.  Probably a bit big, but OVM is a large application with an Oracle XE database and Oracle Weblogic services installed, I thought better safe than sorry. Oracle Virtual Server 3.1.1.  This guest had just a 4GB HD and 1536MB of RAM which I figured would be just enough to get 1 virtual machine up and running on it. My VirtualBox is configured with a couple of host only networks: vboxnet0 => 192.168.56.0/24 => Management network.  I also have dnsmasq configured on this network to serve IP addresses via DHCP to clients on this network.  Dns

Create a NAT for VirtualBox Host Only Network

VirtualBox does a fairly good job with the built in NAT feature on the virtual network device. But there are some drawbacks:  You can't easily monitor the network on the built in NAT.  So if your VM is misbehaving, you couldn't use tcpdump to troubleshoot. The built in NAT reaches directly to the Internet in a transparent manner.  If you wanted to control access to the Internet you would have to switch to a bridge device or go with host-only. Most importantly for me, it does not support GRE packets very well.  This means that if you want to access a Microsoft PPTP VPN from your VM, it won't work with the VirtualBox built in NAT. (Well it didn't for me anyway) EDIT: An updated script for the firewall component is described in a new post found here:  http://david-latham.blogspot.co.nz/2013/03/firewall-script-for-opensuse-and-others.html So with some simple tweaks to your host, you can NAT the VirtualBox host only network and enjoy some extra features. In Virtua

Parsing the Multipath

Having worked a little with XIV I have come to like the "xiv_devlist" tool.  "xiv_devlist" lists all the attached disks on the SAN and the number of paths that are currently active.  This is very useful when you want to ensure that all the paths to storage are active. Find latest up-to-date code for this post on my Github profile:  https://github.com/linuxplayground/mpath_devlist It surprised me to find that there are no useful tools to parse the output from Multipath. Here is an example: multipath -ll mpath2 (3600507680191014a3800000000000100) dm-7 IBM,2145 [size=40G][features=1 queue_if_no_path][hwhandler=0][rw] \_ round-robin 0 [prio=100][active] \_ 0:0:1:8 sdaa 65:160 [active][ready] \_ 1:0:1:8 sdbk 67:224 [active][ready] \_ round-robin 0 [prio=20][enabled]

Policing my network

Policing my network - well not actually policing it, just locking it down. I have decided it's time to worry about what my kids might find on the Internet - my oldest is approaching 7 and beginning to spend more time on the 'puter. So here is the plan.  Not completely implemented just yet but getting there. Enable mac address filtering on the router.  Only devices I know about are allowed to connect to the wireless router and a password is still required to gain access and an IP address on my LAN.  - DONE!  It works great and a quick visit to my router admin page shows me who is currently using it.   Look this is just good sense.  If you are not doing mac address filtering book-mark this blog right now, and go and configure your router! Have a conversation with the child about the dangers and pitfalls of the Internet.  NOT DONE YET!  - I am kind of dreading this bit.  How do I explain to a child that it's bad to do something in such a way that they don't immedia

OGG to MP3 Conversion with ID3 tags

I spend ages every time I need to do this to remember the correct format of the command: here it is at last: /usr/bin/find -type f -name "*.ogg" | while read file; do echo "working on $file"; /usr/bin/gst-launch filesrc location="${file}" ! oggdemux ! vorbisdec ! audioconvert ! lame quality=4 ! id3v2mux ! filesink location="`/usr/bin/dirname "$file"`/`/usr/bin/basename "$file" .ogg`.mp3" 2>&1 && /bin/rm "$file"; done | /usr/bin/tee -a $HOME/ogg2mp3results.txt Find all the files Convert them into mp3 with quality = 4 which is something like 44000khz and br=127kbit Save them with an mp3 extension next to the original ogg Remove the ogg file Tee the output into a log. HA!